
Whenever you see images of arctic explorers and adventurers trudging across the snow, they are rarely carrying a backpack. Instead, they are pulling their gear behind them on a toboggan or sled. These sleds are called pulks.
Not surprisingly, the word pulk originates in winter-loving Scandinavia. The physics behind it is beyond me, but it is certainly easier to pull your gear than to have it on your back. And you don’t have to be on a polar expedition to feel the benefit.
A weekend camping trip will be a lot more enjoyable using a pulk instead of a backpack. It’s also a great way for families with young kids to get everybody out to enjoy a winter day. Simply bundle the kids up and put them on the sled.
And the best part is that virtually anybody can easily and economically build a DIY pulk sled in a single afternoon. All it takes are a few simple tools, and some material readily found in your local hardware store.
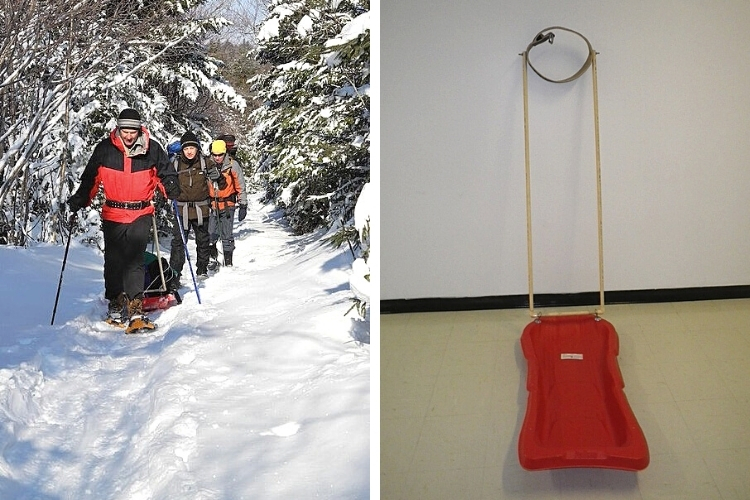
L: The author and his group using his own DIY pulk sled while snowshoeing. For weekend camping trips, pulks can be much more enjoyable than carrying a backpack. Photo: Malcolm Brett R: Once you have finished your DIY pulks sled using the materials above, you will be pleasantly surprised at how little effort it takes to pull your gear. Photo: Doug Scott
The pulk described here is a small toboggan tethered to a heavy belt by poles. Don’t be tempted to simply tie the toboggan to your waist. The poles ensure the sled doesn’t slide downhill faster than you, which is never a good thing. They also give more rigidity to the system, so the sled doesn’t flip over going around corners or riding over high spots.
So without further ado, here are the tools, materials, and steps to build your own DIY pulks sled.
Read More: Tips and Tricks for Cold Weather Backpacking and Winter Camping
Tools and material required
- Electric drill
- CPVC primer
- CPVC solvent cement
- Hacksaw
- 100 grit sandpaper
Equipment required
- Weight lifter’s belt (or another heavy belt)
- Plastic toboggan
- Two lengths of three-quarter-inch CPVC pipe, 5 feet long
- One length of three-quarter-inch CPVC pipe, 16 inches long
- Two three-quarter-inch 90o CPVC elbows
- Two 3/8” eye bolts – 4 inches long
- Two 3/8” washers
- Four 3/8” nuts
- Two 3/8” lock washers
- Two quarter-inch bolts – 2 inches long
- Four quarter-inch washers
- Two quarter-inch nuts
Working with CPVC
CPVC is a good choice for the poles of the DIY pulk sled because it is strong, light, easy to work with, and readily available in the plumbing section of your neighborhood hardware store. It generally comes in 10-foot lengths, so you will need to buy two lengths for this project. CPVC is easy to cut to length with a hacksaw. Care should be taken to make sure the cut is square. After the cut, clean off any burrs with 100 grit sandpaper.
Before gluing any joint, dry fit it first. When joining the short piece of pipe to the elbows, it is a good idea to draw alignment marks on both the pipe and the elbows before applying the glue. Both elbows must be pointing the same way so that they are parallel when the poles are installed.
When you are ready to glue the joint, first spread a primer on the outside of the pipe and the inside of the elbow using the brush supplied with the primer. Then apply the solvent cement to the pipe and inside of the elbow, again with the brush supplied with the cement. Next, slide the pipe into the elbow. Turn the pipe about a quarter turn to make sure the cement is evenly spread. Make sure the elbows are aligned properly, then allow the cement to set according to the instructions on the can.
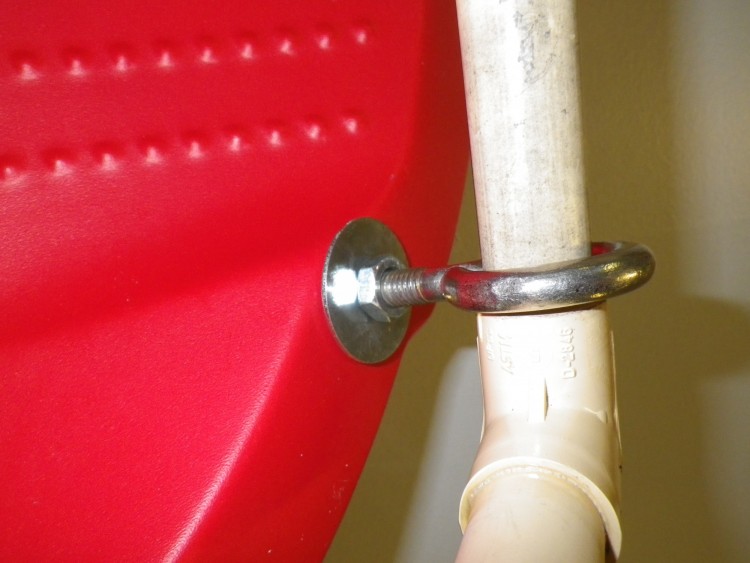
After drilling the holes in the front of the DIY pulk sled, you’ll want to slide the short CPVC pipe into the eye bolt. Then, glue the 90-degree elbows to either end of the piece of pipe using CPVC solvent cement. Photo: Doug Scott
Procedure
- Drill two half-inch diameter holes at the front of the toboggan. These holes should be the same distance from the side edge of the toboggan and about 14 inches apart (or about 2 inches less than the length of the shorter CPVC pipe).
- Put the two eye bolts into the holes with a nut and washer on the top and a nut and a lock washer on the bottom. The washers are important to make sure the plastic toboggan doesn’t rip when it is being pulled. Tighten the nuts.
- Slide the short piece of CPVC pipe through the two eye bolts. Now glue the 90o elbows to either end of this piece of pipe using CPVC solvent cement. Make sure that the open ends of the elbows are aligned the same way. See the section above on working with CPVC.
- Now glue the longer lengths of pipe to the elbows. Again, these pipes must be parallel.
- Now attach the belt to the poles by drilling a 5/16” hole about 1” from the end of each pole. Also, drill a 5/16” hole on both sides of the belt where the poles will attach. It would help if you marked where these holes will go with the belt around your waist. Next, attach the belt to the poles with the quarter-inch nuts, bolts, and washers.
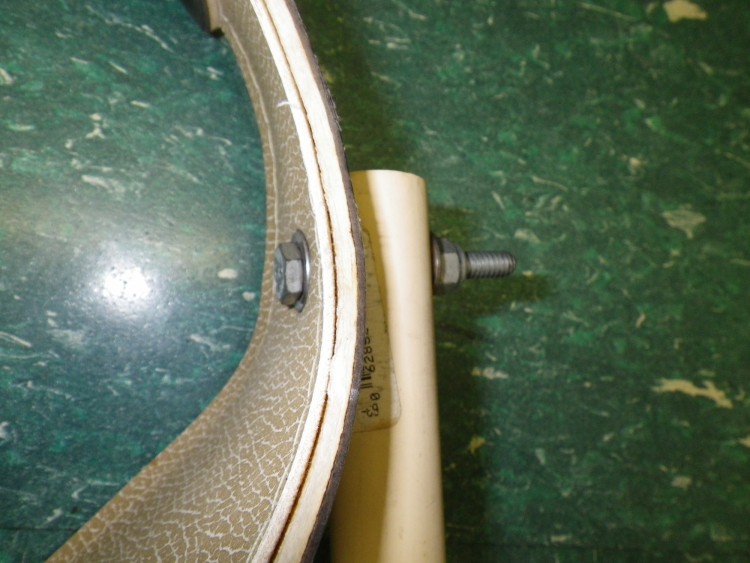
Attach the belt to the poles by drilling a 5/16” hole about 1” from the end of each pole. Also, drill a 5/16” hole on both sides of the belt where the poles will attach. Photo: Doug Scott
Get on the snow
Now the next time you are heading out, consider turning yourself into a dog sled instead of a pack mule. You will be pleasantly surprised at how little effort it takes to pull your gear.
What other recommendations do you have for building a DIY pulk sled? Please share your thoughts and experiences with us in the comments below.
This article was first published on Jan 10. 2012, and Susan Wowk most recently updated it on July 6, 2021.
Read Next: The Joy of Pulk Running
One thing to strongly suggest is that you build it with the poles crossed, or at least capable of being crossed when needed. This (crossed) is the generally preferred method as it greatly facilitates making turns, causing the sled to move in a arc consistent with your turn.
awesome how-to article Doug! We also have pretty good instructions for how to build a ski pulk at ORS Snowshoes Direct that was originally drawn up for use with the Mad River Rocket sleds, but can be universally applied as well.
I made mine 16 years ago. I like the idea but it can be improved. Peace from Florissant Colorado.